

DIY Home Landscape Project.
Getting Started--Back Yard Assessment:

Getting Started--Front Yard Assessment:

Setup Stage--Getting the Materials and Storing at the House:


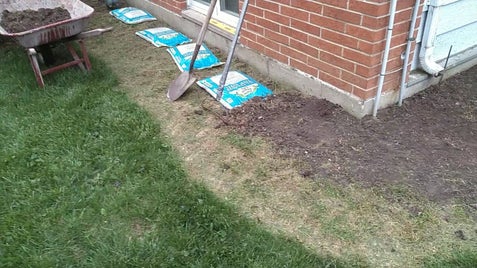
"Before Picture" of the Backyard Rock Border Location:

Install Stage Backyard Rock Border Begins on April 19, 2023-- The Concrete Pad is Moved:


Electrical Prep Work for Underground Future Circuit
to Storage Shed:

Ready for the Rock Border Install to Proceed:

Backyard Rock Border Install Stage Dirt Work Completed:

Beautiful Weather This Day:

Install Stage Front Yard Rock Border:

Using a 2-Foot Level to Slope the Ground Properly:

Front East Side Yard Dirt Work Completed:


Tumbled Belgian Edger Blocks:

Foundation Underneath the Kitchen Windows:


Front Door Stoop Area:

Backyard Foundation Area:


Front Door Stoop Area Completed:


Front Yard Front of House Foundation Area:


May 3, 2023: Perfect Blue Sky.

May 3, 2023: The River Rock Close Up--Needs Washed.

May 3, 2023: The Rock Border Front Yard Install Completed.

May 4, 2023: Cutting Tumbled Belgian Edgers to Fit.

May 8, 2023: More Materials Needed.

May 10, 2023: Ditch for Orange Cable--Backyard Prep.


May 12, 2023: More Materials Needed Again.

May 12, 2023: Eastside Front Yard Mulch Install Prep.


May 12, 2023: Westside Front Yard Mulch Install Prep.

May 12, 2023: Middle Front Yard Mulch Install Prep.


May 15, 2023: Tools and Materials for the
Front Yard Mulch Install.

May 17, 2023: Eastside Front Yard Mulch Install
Mulch Fabric Laid.

May 17, 2023: Middle Front Yard Mulch Install
Tumbled Belgian Stones and Interloc Blocks Set in Place.

May 18, 2023: Eastside Front Yard Mulch Install
Mulch Fabric Finished and Plastic Edging Installed.

May 18, 2023: Eastside Front Yard Mulch Install
Patio Paver Bricks in Place.

May 20, 2023: Eastside Mulch Install Completed.

May 22, 2023: Prep for Westside Mulch Install.


Mock Orange Shrub in Full Bloom.


May 23, 2023: Westside Front Yard Mulch Install
Carport Area.

May 25, 2023: Cedar Chip Mulch for Carport Area.

May 26, 2023: Mulch Fabric Under Shrubs.

May 27, 2023: Westside Mulch Install Progress.
Cedar Mulch Chips.

May 28, 2023: Plastic Edging Installed.


May 28, 2023: The Sky Just Before Sunset at 8:22pm.

May 29, 2023: Memorial Day USA, Tucking Mulch Fabric Under Fence Just Before Cedar Mulch Chips are Put in Place.

Landscape Staples on Backside of Bricks to Hold in Place.

Cedar Mulch Chips in Place Next to Carport at 11pm--
Good Day!


May 30, 2023: Westside Front Yard Mulch Install Completed.

Steppingstone Added to Front Yard Rock Border at Carport.

June 8, 2023: Middle Front Yard Mulch Install--Prep.


The Baby Maple Tree Grown from a Seed.

Soil Work for Edger Stones--Shovels Required.


June 9, 2023: Progress on Middle Front Yard Mulch Install


June 12, 2023: Progress on Middle Front Yard Mulch Install


June 14, 2023: Progress on Middle Front Yard Mulch Install


June 16, 2023: Progress on Middle Front Yard Mulch Install


On June 16, 2023, the Middle Front Yard Mulch Install was completed except for "Punch List" of odds and ends left to do for 100% completion of entire Front Yard Mulch Install.

On July 6, 2023, the last of the "Punch List" items were completed and the entire Front Yard Mulch Install was signed off on as 100% completed. Next, the Backyard Landscape Install is scheduled for July 9-30, 2023.

July 16, 2023: Pictures on the way. Rock installed on west side of storage shed and Wood Mulch on the backside of storage shed. More materials are being scheduled for pick up on July 17, 2023. The project is on track to complete by July 30, 2023.
July 31, 2023, Update: Due to the excessive heat warnings last week (Wednesday-Friday) the project is now projected to complete by August 7, 2023. As of July 31, 2023, most all of the landscape project is now done with 2-3 days of work left to do. Pictures and text will be added very soon to bring this page up to date...
August 17, 2023: Update: Due to the many rain delays (the rain was needed because of the ongoing severe drought conditions) the landscape project was not completed until August 17, 2023.
July 11, 2023: Progress on the Backyard Landscape


July 13, 2023: Progress Backyard Landscape


July 18, 2023: Progress Backyard Landscape


July 19, 2023: Progress Backyard Landscape


July 20, 2023: Progress Backyard Landscape


July 22, 2023: Progress Backyard Landscape


July 25, 2023: Progress Backyard Landscape


July 26, 2023: Progress Backyard Landscape


July 27, 2023: Progress Backyard Landscape--Excessive Heat Warning 3 days in a Row (this is 2nd day of 3)
111 Degrees F in the Open Air in Partial Shade!!!


July 30, 2023: Progress Backyard Landscape--Working Late in the Day to Avoid the Heat.


July 31, 2023: Progress Backyard Landscape--done at 11pm.


August 2, 2023: Progress Backyard Landscape


August 4, 2023: Progress Backyard Landscape--
90 degrees F in the Shade.


August 16, 2023: Progress Backyard Landscape--
Punch List of Final Items (1 day to 100% completion).


August 18, 2023: Last Day--Completion of Project


WECOME TO THE DIY HOME LANDSCAPE PROJECT.
This project began on April 9, 2023, after celebrating Easter Sunday. The weather was really great in the mid-to-upper 60s (Fahrenheit) and sunny and a slight breeze. Perfect to start an outdoor yard project. So, that is how it started on this perfect day in April. A look at the back yard and front yard as an initial assessment revealed that there are several improvements to make in this yard for this year that will last for many more into the future.
On April 9-10, 2023, the materials needed for this project were purchased and the deliveries began. The initial landscape bricks were stacked on April 9, 2023, and put in close proximity to where they will be placed next to the mulch border. This is day one of the DIY Home Landscape Project and it should be done (hopefully) in approximately three weeks.
Tuesday, April 11, 2023, was spent picking up materials ordered on Monday. 3,200 lbs. of River Rock were picked up and stacked neatly in a pile of 64 (50lb.) bags. More scheduled pick up runs for materials are scheduled for Wednesday. Mulch, rebar, and wood (treated 8 feet length) landscape boards for the border of the River Rock around the foundation walls to protect so that rainwater/snow melt won't seep into the basement.
More materials were purchased on Tuesday overnight to be picked up on Wednesday and Thursday. More wood mulch (100 more bags), more River Rock (36 more bags), and Retaining Wall Block (45 total) for the back porch patio near the sliding door where the dirt is getting on the concrete (15 needed there) and for the front yard to circle around the big Maple tree's trunk (30 needed there). So, 10 more trips to the supply store will be required over the next two days.
It is important to make a good assessment of the "Do It Yourself (DIY) Home Landscape Project" at its beginning. Looking over the yard to decide exactly what is needed to be done and then making a plan of the work required and the material needed to successfully complete the project. Budgeting for time and money is also important.
At the start of this project a good assessment was made over the course of a few days. I decided that Landscaping Bricks would be used along the mulch border, and I found some at the supply store at a great bargain and purchased approximately 2/3 of what would be needed for the entire project and began picking them up on Sunday April 9, 2023. The assessment concluded as I walked over the yard both back and front and recorded a video of the property after I started laying out the spots where mulch is to be added. This gave me an idea as to how the landscape will look as it gets worked and what other materials are needed.
A goal of this project is to find materials needed at bargain prices to keep the budget down to a very reasonable level of expenditure. So far so good--many bargains have been found in all of the products purchased thus far for this project. Hundreds of dollars in savings have already happened just in the materials purchased. This added to the savings by doing the work myself ends up saving me thousands of dollars that would have been spent otherwise. Getting the project successfully completed with quality workmanship, well thought out and planned and executed, and saving thousands of dollars along the way makes this DIY Home Landscape Project very worthwhile. Labor is required. I am picking up my own materials, but deliveries could be made by others instead--I have a truck, so I chose to pick up materials myself--more savings.
This is no small Landscape Project, though. It is sizeable for a single-family house. Of course, a smaller project won't have the same rather large savings in dollar amounts, but in proportion the savings still hold true as percentages. Material markups by contractors and delivery expenses and labor expenses can be drastically reduced. Of course, the workmanship is up to you on your project--the quality of work you do which could be the same or better than hired labor. You are the boss on your own DIY project. That is up to you. On my project it is up to me.
This DIY Home Landscape Project that I have committed to is now defined as a complete wood mulch of both the back and front yard, and a rock border around the foundation wall of the basement and front of the house with landscape 8mil plastic at the bottom on top of the ground to serve as a water barrier to keep water out of the basement. The basement is in the process of being totally finished and though it has a sump pump it is a good time to make the basement more protected from any water seepage around the foundation wall. In all, the project requires approximately 10 cubic yards of wood mulch, and 4 cubic yards of rock (River Rock is being used since it is at a bargain price of 20-33% off of regular price).
Many of these projects use White Rock as the preferred rock for this purpose, but the River Rock are totally acceptable and provide a huge savings for this project--the White Rock at this time is at least 123% higher in price today in my local area. For your project you will be doing the shopping and making the decision as to what you want to use. There are decorative rocks that can be used to provide a very high aesthetic quality if you want much better-looking rocks at your house. Of course, the decorative rocks are usually much more expensive--some people can find great bargains even in these, though. I found my bargain and settled for the River Rock and I think they will look very good in this case after they are washed off with water from the garden hose after they are completely installed on the ground at the foundation.
At the end of the day on Wednesday, April 12, 2023, the DIY Home Landscape Project is well into the Setup Stage where the materials are purchased and picked up at the supply store and delivered and stored at the house. A 1997 Ford Ranger XL (with a 2.3L engine and manual transmission) pickup truck is used to make my own deliveries. This particular truck is very easy on gasoline being the best gasoline MPG pickup truck model ever built--25mpg on average and has gotten 44mpg on the interstate with a tailwind. I just had to throw that in because it is a great way to save on delivery expenses if you can find a small pickup truck that has great gas mileage to use to get the materials yourself. A small truck means more trips to make to get all the materials, but with a lower cost per mile by far than the large truck. Use what you need to get the materials though and remember that by Doing It Yourself you are saving the most money regardless of the delivery method.
The materials are stored and secured in the back yard inside the fenced in area that has a lockable gate as an entrance. The materials are also stored off of the grass to prevent grass damage and spread out over the concrete patios and sidewalk to prevent the weight of the materials from damaging the concrete--concrete can crack and even sink if too much weight is applied to it. A large pile of these materials can weigh over 1-2 tons easily and the concrete can be damage--be careful when storing heavy piles of materials for such reasons. The mulch is stored on the sidewalk and patios, the River Rock is stored on top of the Horseshoe Pit. (The River Rock is now 64 bags at 50 lbs./bag for 3,200lbs. and will be another 36 bags bringing the total to 100 bags at 5,000 lbs. total.) The Landscape Timbers are stored on the wood deck under the ease.
More materials are delivered on Thursday, April 13, 2023, and then again on Friday, April 14, 2023, and stored appropriately in the back yard. On Saturday the last two trips to the supply store are planned to pick up the last of the materials that are needed. Anything beyond these materials after Saturday, April 15, 2023, is extra above the $1,500 budgeted for materials for this project. The materials that have been purchased are completely paid for and approximately 50% more have been added since there are great bargains at this time which allows this project to cover more of the landscaping in the yard than was expected--good! A complete material list will be posted soon.
All of the materials shown to the left in the picture column are going to be installed in this landscape project throughout both the front and back yards. All of the materials have been purchased from Menards in Champaign, IL (a building supply store). There are some additional items which may be added at the end of the project that were not going to be added until the next year or two--but may be added in this current landscaping if the sales bargains are there at that time. We will see 1-3 weeks from now. So, the materials budget may be bumped a little higher if the bargain sales are there.
All of these materials have been purchased at Menards in Champaign, IL and driven by pickup truck to the house to be stored for the project. Most of the materials were bought by shopping online at the store's website and then picked up in person by going into the materials yard around back through the guard gate. This saves a lot of time for the customer--convenience of not having to go through the store and the cash registers. The drive to the store and back to the house is approximately 36miles. Many round trips in a small pickup truck.
I want to mention an important point here about safety. The temptation is to try to save on the number of round trips in picking up materials if you are going to make your own deliveries by driving the materials from the store yourself wherever that may be. The temptation is to try to put more weight in the Truck/Trailer/SUV/Van/Car than what it is rated for in its "Payload Capacity" and then you may think that fewer trips will be needed in this way. It is dangerous and gets more dangerous the more that the "Payload Capacity" is exceeded.
The "Payload Capacity" is the weight that the vehicle can safely carry beyond its "Curb Weight". Exceeding the "Payload Capacity" can end in a tragic wreck. The vehicle may not stop properly when the brakes are applied, and the vehicle's rear axle could actually come apart from the drive shaft. Remember to practice proper safety. Get your materials without endangering yourself. A few extra round trips may be required than planned, but you'll be safer that way.
On Saturday, April 15, 2023, another two round trips to the store are planned. More 3-1/2" X 12" X 4" Quarry Gray Tumbled Belgian Edger Blocks (27 X 14lbs. each) total weight of approx. 378lbs., and more 4" X 8" Red/Black Patio Holland Paver bricks (200 X 3.72lbs. each) with total weight approx. 744lbs. This requires two trips in my older (26 years old) pickup truck. In earlier years I would haul up to 900lbs. of materials per load in it (which topped out the payload at the maximum allowable weight), but nowadays I don't like hauling more than 600lbs. of materials in the truck bed. In these two trips the weight I am hauling is approx. 561lbs. each time for the materials plus my weight and the weight of the toolbox and tools in the back of my truck (which are included in the "Payload Capacity").
It is not as hard to figure the weight and "Payload Capacity" as it may seem at first. The "Payload Capacity" is: The "GVWR" (Gross Vehicle Weight Rating) minus the "Curb weight" and both of these numbers are stated for each and every vehicle from the vehicle's manufacturer. The numbers can be found online by searching the particular vehicle that you are using. The numbers never change so you can write them done, store them on your phone or computer to reference them when needed. Be safe.
Also, be safe when moving the materials. Don't hurt yourself. Wear gloves when needed. Use a wheelbarrow. Don't hurt your back when lifting. Use proper lifting techniques. Also, don't create trip hazards for yourself and others. Stack the materials so that they will not be tripped over, and so that they will not fall over. If there are going to be children or pets around then be considerate of them. Be safe.
April 16-22, 2023 was a productive week. The Install Stage of the project started with prep work in the backyard for the Rock Border for the Foundation to ensure that water does not get into the basement from rainwater/snow melt. The project is moving forward as scheduled and will have many updates.
This Landscape Project is moving forward at a good pace for this year's early Spring season. The weather is really cooperating well with very few weather-related delays. The picture to the left showing the back of the house underneath the air conditioner that is mounted up off of the ground is a "before picture" of where the Rock Border along the foundation in the backyard will be installed. The large solid concrete pad is where the air conditioner used to sit on the ground. This pad will be moved 6-feet farther from the house to make way for the Rock Border. This pad weighs approximately 459lbs. and will be a handful to move, but with some ingenuity and experience of moving large heavy pads before the job will get done. Also, there will be an electrical circuit installed in the future to the storage shed in the backyard from the GFCI receptacle box next to the A/C disconnect on the brick wall. The circuit will be run underground from the bottom of the box using a 10-foot piece of 1/2-inch rigid metallic conduit for the first 10-feet. The circuit will have an underground feeder cable run into the box through the conduit. That conduit has to be installed at this time so that the Rock Border can be placed on top of where that conduit will be buried without having to disturb the Rock Border in the future.
First of all, the concrete pad is moved using a lever that is kept just for tasks as this. It is two 2" X 4" X 8' nailed together like a door cripple and a stud. Then short 2" X 4" blocks are used to slide under the pad to keep it from dragging on the dirt--the pad slides fairly easily across the blocks. The blocks are also used as the fulcrum for the lever to pry up on the pad and then gradually "walk it over" step by step to where it is to be placed. The pad will be kept for putting garden hoses and other yard items on top of--it still has a useful purpose. Rather than waiting for a couple of people to help move the pad I was able to do it myself without hurting my back or anything else by using the lever and fulcrum and blocks. I have done this before and so I got it done again this way--took the time and did it safely.
Next, the electrical conduit (pipe) is installed for future use. A spade shovel is used to dig a narrow ditch/trench for the pipe. The pipe has to be at least 12-inches under the ground. It will be for one 120VAC 20amp branch circuit off of the house electrical panel and protected by the 120VAC GFCI receptacle mounted on the exterior wall next to the A/C unit. The circuit will be wired to the load side of the GFCI receptacle. The end of the pipe buried under the ground is taped with duct tape over its end to keep water and dirt out until it is completed in the future--maybe later this year or next year. After the pipe is installed and everything is put back together the trench is filled with dirt to cover the pipe and then the dirt is tamped down.
Now the Rock Border can be prepped for the plastic sheeting, Landscape Timbers and River Rock. The ground has to slope away from the foundation, so it is checked for level using the 2-foot level. The ground has to be adjusted--some places are too high and some too low. Rake, shovel, and 12 bags of topsoil are needed to prepare the ground for the Rock Border installation. There is a low spot in the ground where the concrete pad used to be that cannot be adjusted. During heavy rains this spot will be where water will puddle--the deeper the puddle will be the more it rains. So, this spot will be where a catch basin is installed in the near future to drain away the rainwater and snow melt that puddle up there. The topsoil is wet and needs a couple days to dry before the plastic sheeting can be placed over it--and then it rained for a couple of days so then it needs another two days of dry weather. After all of this, the ground in the backyard at the back of the foundation is now ready for the Rock Border.
While the ground in the backyard is drying the front yard is ready to work on. So, the work shifts over to the front yard for a couple of days. The dirt prep work is done first. The grass next to the foundation is trimmed down to the dirt like a crew cut hair style out to 40-inches from the foundation. This is where the plastic sheeting will be placed on top of the ground for the Rock Border that the River Rock will be placed on 2-inches deep. After trimming the grass, a check with the 2-foot level along the ground next to the foundation shows that just like the backyard Rock Border the ground in the front yard and side yard to the east in some spots the dirt is high and needs shaved down with the shovel and other spots the dirt is low, and needs built up with topsoil.
The wheelbarrow comes in handy for tasks like this along with the shovel and garden rake. Three wheelbarrow full loads of dirt are moved from the high spot at the back corner of the house on the east side and moved to the north corner of the east side where the ground is low. The ground is now sloping away from the foundation properly and now the work on the front of the foundation at the south-east corner begins. Four bags of topsoil (3 cubic feet) and half a load of dirt in the wheelbarrow are needed along the front of the house at the foundation for the ground to be sloped properly.
Next, the foundation under the kitchen windows and next to the carport on the south-west corner of the front of the house is prepared for the Rock Border. The ground is raked and shown to be mostly sloped properly already. The Tumbled Belgian Edger Blocks in Quarry Gray color will be used as the edging for this area. They will be placed next to the concrete sidewalk, front door stoop, and driveway next to the carport. The dirt there in those spots is lowered to 1-inch below the top of the concrete where the blocks will sit in the dirt. After this is done, the front yard Rock Border is ready for the plastic sheeting, edging, and rocks.
The front yard Rock Border is finished under the kitchen windows along the foundation. It looks great. The Belgian Edger Blocks are a good choice. They match in with the red brick of the house very well. They make an excellent edging for the River Rock. Twenty-two bags of River Rock (1,100lbs. in weight and 11 cubic feet in volume) are spread evenly at 2-inches deep. The River Rock looks dusty and dirty with the clay dirt residue on them but will be washed off with car wash soap sprayed on to them and then rinsed off with the garden hose after all of the Rock Border is installed along the foundation both front and back yards. The River Rock has various types of rocks mixed together including both red and black granite and also quartz. It should look very good once it is washed off.
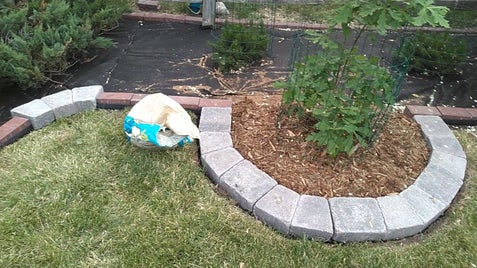
Now, back to the Rock Border in the backyard. The ground is now dry and ready for the Rock Border to be installed in the area along the foundation under the air conditioner and over to the corner on the north-east of the house. The Landscape Timbers are used as the edging from the A/C unit to the corner and then the Tumbled Belgian Wedge Blocks in Quarry Gray are used to maneuver the edging around the trunk of the Emerald Shrub. Looks great. The Tumbled Belgian Edger Blocks are used on both ends of the Rock border as well. The plastic sheeting is in place with the edge next to the foundation turned up into a lip against the wall. The rocks are then added. Fifteen bags of River Rock (750lbs. of weight and 7.5 cubic feet of volume) are spread evenly over the plastic sheeting at 2-inches deep.
The Rock Border in the backyard is now finished except for one thing. The Tumbled Belgian Edger Blocks on the end under the A/C unit need one block cut to fit to finish the Rock Border out, and then one more bag of River Rock will be added there. A concrete/masonry blade in the circular saw will be used to cut the block. This will be done after all of the Rock Border along the foundation is completed except for wherever there are other blocks also needing cut to fit--so far three including the two at the front of the house under the kitchen windows. That will be the last thing to do at the end of the Rock Border Install.
After this part of the Rock Border Install is done and the work shifts back to the front yard again a delay happens. A rain delay and a health delay. I came down with a chest cold and didn't want to risk anything more severe, so I took a few days to stay indoors to get over it. The temperatures dropped to 29-32 degrees F overnight for those nights, so it was a wise decision to avoid a more serious sickness. Also, with the rain the ground was too wet, and the threat of pneumonia was too risky. Anytime it rains when the temperatures are so cold it produces a high risk of pneumonia, so I avoid it.
After a few days, the weather is better, and the ground is dry enough to work some more on the front yard Rock Border Install. The grass has been trimmed down to the dirt where the Rock Border will be placed. The next spot to work on is next to the front door of the house just off of the concrete stoop and around the corner to where the gas meter is located. The Tumbled Belgian Edger Blocks and the Tumbled Belgian Wedge Blocks both in Quarry Gray are used as the edging here, too. The ground is dug out slightly (one-inch deep) where the blocks will lay just like in the other spots in the Rock Border--same thing. The blocks will sit in this dirt channel where they will be solid so that they will not move when bumped by lawn mowing and foot traffic.
The Rock Border is installed by the same method. The plastic sheeting is placed down with the 2-inch lip against the wall and the edging blocks placed on top of the outside edge. Fifteen bags of River Rocks are added (750lbs. in weight and 7.5 cubic feet in volume) to get around the corner to the gas meter location which is approximately halfway to the far corner of the front of the house. Once again, the edging and the River Rock look great.
Then, the next day (Saturday, April 29, 2023) another rain delay occurs. Only 4 hours of the day (4-8pm) are dry enough to work outside. The rest of the Rock Border Install is prepared for, though. The plastic sheeting needed is cut to length, the rebar stakes are cut to length and filed on the ends to remove sharp edges, and the Landscape Timbers are cut to length and the rebar stake holes are drilled into each of them. Also, the corner of the Rock Border at the far side of the house on the east side will have the Tumbled Belgian Wedge Blocks in Quarry Gray there in a quarter circle where they will meet the Landscape Timbers on their ends. The edger blocks are laid out into place precisely where they will be installed at this corner. The dirt channel will need to be dug 1-inch deep for them but otherwise they are ready in place.
Rain is forecast for Sunday, April 30, 2023, so the outdoor work will probably be delayed another day until Monday. Sunday will be a resting day and shopping day. More Tumbled Belgian Wedge Blocks (6) are needed, and also one oversized Tumbled Belgian Block (14-inches long and 7-inches wide) to make the edging look better at the front corner by the small shrub where the wedge blocks turn in an inverted semi-circle shape to meet up to the edger blocks. It will look much better with this block added. Also, the sump pump PVC pipe was cut off to make way for the Rock Border and needs a 90-degree PVC drain fitting glued on to the end there. One more item on the shopping list is a 2-1/2-inch 2-hole strap for the PVC pipe so that it can clamp on to the pipe at the 90-degree fitting properly. Monday work should resume on the Rock Border Install and should conclude on Tuesday. The Mulch Border Install will then begin in the front yard.
The Rock Border Install in the Backyard and Front Yard is completed. The Front Yard Mulch Install is 2/3 completed as of June 1, 2023.
*****Please be patient. The pictures are getting ahead of the text. Please view the pictures shown in the column to the left for the full up to date progress of the project. The text in this column is being updated daily. *****
More information about this project will be made available as soon as possible. The project is progressed very well. The front yard mulch installation was about done by June 12, 2023. The Webideo YouTube videos are available to watch. Also, Photo Albums at the bottom of the column to the left. There were more major updates to this project on July 10-30, 2023. The project got into full swing, and a lot of landscape improvements were made, and more were scheduled. The entire landscaping was scheduled to finish up by the end of July 2023. This is a great project to improve the house.
Note: This webpage, "DIY Home Landscape Project," is supplemented by information (Updates) posted on my LinkedIn profile, and by videos available on my YouTube channel (Webideo). The links are at the bottom of this page and if you want to see more just "click" on them and you will be taken there.
(Pictures and Photo Albums are now completely updated and the text in this column will be added to and finished very soon. Landscaping completed 8/18/2023!)
Update: The DIY Home Landscape Project was scheduled to be 100% completed by 8/7/2023. Due to the many rain delays and the excessive heat warning days the 100% completion of the landscape project was delayed to August 18, 2023.
August 18, 2023, was the final day of the project--"Picture Day". The DIY Home Landscape Project is now officially 100% completed. The backyard landscaping is done and earlier in the Summer the front yard landscaping was completed... Next Spring, the landscaping will be added to with a "phase 3" but it will only be a minor project lasting approximately 2 weeks... That's it for now, though...